Olivia Dem'adas
Chief of Clan Dem'adas
Images:
Profile View
 Top-Down View
Shield Tower Placement
Image Source: Wookieepedia, MS Paint,
Citation: The general theme and several portions are based heavily on the wookieepedia entry for the IM-455 Modular Garrison. Additionally, a section of a wikipedia article on Dragon's Teeth is quoted within this sub. Any direct quotes are cited appropriately with a link to the appropriate source. General Population and Combat Forces section borrow heavily from IM-455 sub, with minor edits.
Development: Here
Intent: To create a believably sized planetary garrison base, based on canon sources, for use in an upcoming invasion and beyond.
Name: Mandalorian Heavy Outpost
Classification: Cer'keldab-class Heavy Outpost
Location: Wayland, (currently)
Affiliation: Mando'ade
Main Structure Height: 200 meters
Main Structure Width: 280 meters
Death Fence Diameter: 680 meters
Death Fence Circumference: 2137.1429 meters
Diameter from Treeline to Treeline: 2,280 meters
Circumference of Clearing: 7165.7143 meters
General Population:
Description:
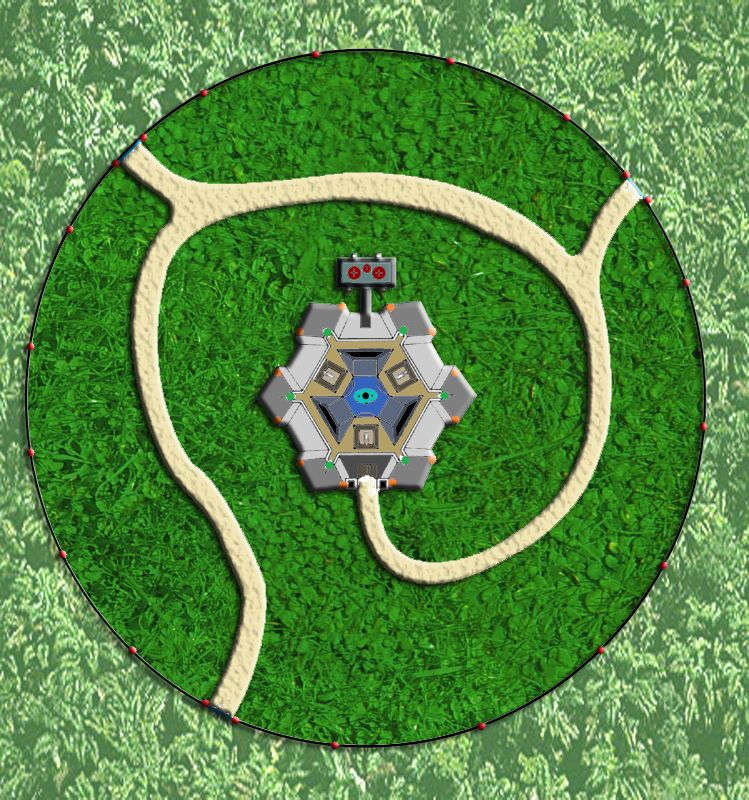
The main structure of the Cer'keldab-class Heavy Outpost is a modernized IM-455 Modular Garrison constructed out of Graphite-Reinforced Durasteel and powered by six Tenloss L-HARC Hypermatter Reactors. It is comprised of eight levels and is topped "by a sensor and communications tower. Levels one through five, all identical in size and shape, consisted mainly of large surface vehicle bays where all the surface vehicles were stored, maintained, and deployed from. They also contained most of the personnel quarters as well as the armory, detention cells, and most other key base areas."(x) "Level six held the officer's quarters, ...fighter pilots' quarters, command rooms, and so on. Level seven consisted entirely of ...starfighter hangars. Level eight was the deployment chutes and control rooms for the base's (starfighters). (Starfighters) were launched, retrieved, and manipulated by the base's powerful suite of tractor beam projectors. Garrison bases also (have) underground sub-levels which contain the (reactors) and main infastructure."(x) These underground sub-levels are extensive and extend outward from the main structure to 120 meters at the furthest point, and 80 meters at the deepest. The underground sub-levels are made of the same Graphite-Reinforced Durasteel as the rest of the complex, but are built after the base's initial installation as the needs of those working out of the base expand beyond its initial capabilities.
The main structure of the base is 200 meters tall and 280 meters wide. A 200 meter wide open space extends beyond the exterior of the structure and is surrounded by a perimeter energy fence. This area is known as 'the courtyard'. Beyond the perimeter fence is an 600 meter open space dotted with bunkers, trenches, anti-tank traps, a handful of roads wide enough to turn an AT-AT around on, and an expansive minefield. This area is called 'the garden' and is often pot-marked by craters, and the bunkers that dot it are often referred to as 'the office' by the troops assigned to man them. Beyond the outermost layer of defenses, a further 200 meters of open field is kept clear with a regular culling of local flora. This area is often referred to as 'the back 20'.
A 50 meter road connects the main entrance of the structure to a 1,000 meter long circular road that nearly encircles the entire main complex. At three points, one of which being the far end of the main road, three 50 meter long roads branch out towards the three Force Field Gates that allow entry and exit through the Death Fence. On either side of this road, spaced roughly every 35 meters, is a Tank Pit. Each Tank Pit is a simple hole dug in the ground and reinforced with wood logs. The hole is rectangular and shaped specifically to house a tank at a depth that allows the turret to be protrude above the ground but leave the rest of the vehicle concealed. The rear side of this hole is a dirt ramp reinforced by wood logs, allowing a tank to enter or exit the Tank Pit as the vehicle's commander pleases. Each ramp is angled towards the main structure and is angled in a manner that allows the base's defensive weapons a clear line of sight into each and every Tank Pit.
The three roads that exit the compound through the perimeter fence branch off into a total of five roads leaving the compound. Each road takes a twisting, turning, spiral route through the surrounding 800 meters of open space between the perimeter fence and the treeline. Since the roadways are the only safe way through the minefields, these roads twist and curve so as to greatly extend the amount of time an approaching hostile must spend in an open and exposed position as they close on the compound under heavy fire. Each of these roads is also lined with a Tank Pit on either side of the road at every 35 meters out to a distance of 250 meters from the perimeter fence. Each of these tank-pits exit towards the main structure and is angled in a manner that allows the base's defensive weapons a clear line of sight into each and every Tank Pit.
The HAS Military Shielding for the base taps into the bank of six Tenloss Hypermatter Reactors and has two sets of emission towers. The inner set of emission towers surrounds the primary structure itself, and produces a significantly stronger shield than the outer set of emission towers. The outer set of emission towers are placed just within the perimeter of the Death Fence, causing an active Ray shield to be projected on the outside of the Death Fence and the particle shield to be emitted on the interior side of the Death Fence. Only one set of emission towers is activated at a time. Built into the frame of the main structure are three Tempest Orbital Defense Cannons, which are able to fire at any target within a 30-degree cone while pointed strait up. Each turret is only capable of 45-degrees of declination at its base, along a set angle. From anywhere along this angle, as well as when pointing strait up, each weapon is capable of firing at any orbital target in a 30-degree cone. Meaning that the weapons are incapable of use against ground targets and have too-slow of tracking speeds to effectively engage starfighters. Capital ships that happen to find themselves within the arc of one of these weapons, and far enough from the ground, are generally displeased to find these massive turbolasers operational.
Also built into the walls of the fortification are a number of defensive turrets and secondary weapon systems. A single Kebii'tra Aranar AA Platforms protects each of the structure's six sides. These turrets are placed to give them a wide view of incoming aircraft, but also to allow each turret to fire upon ground targets, including those beyond the Death Fence. Also built into the walls of the structure are twelve evenly spaced Kerauno Missile Turret capable of firing a wide range of missiles that include their standard anti-air complement, laser-guided surface-to-air and surface-to-ground variants of their standard missiles, as well as FU-2 Rockets. Situated near these missile launchers and AA platforms are six directional repulsorlift jammer projectors capable of emitting a 600 meter beam of effect that is 45 meters at its widest point.
Along the interior of the Death Fence runs a durasteel walkway at a height of 8.5 meters from the ground. This walkway is held up by several Graphite-Reinforced Durasteel pillars and connects each guard tower to one another. Each guard tower is made of Graphite-Reinforced Durasteel and is equipped with spotlights, a bi-pod mounted anti-personnel heavy weapon, and a number of basic sensor and communications systems. Each decagon-shaped tower has 8 glasteel windows that can be slid open or closed and eight alusteel shutters that can be used to seal these windows. On two of the tower's sides that face the compound, these windows are replaced by standard sized alusteel doors. Typically, 2-5 Infantry man each of the perimeter fence's 21 towers and a small number of men patrol the walkways between each tower.
Along the outer edge of the Death Fence, just three meters from where an active ray shield would project, is a wood reinforced trench designed to stop tanks. The trench is 15 meters wide at the top and 4 meters wide at the bottom and 6 meters deep, with a staggered, five-deep row of Dragon's Teeth running along the outer edge of the trench. The Dragon's Teeth barricade "rested on a (duracrete) mat between ten and (20) meters wide, sunk in a meter or two into the ground (to prevent any attempt to tunnel underneath them and place explosive charges). On top of the mat were the teeth themselves, truncated pyramids of reinforced (duracrete) about a meter (and a half) in height in the front row, to two (and a half) meters high in the back. They were staggered and spaced in such a manner that a tank could not drive through."(x) The angle of the interior slope of this trench is designed so that gunners on the Guard Towers or along the perimeter walkway have a clear line of sight to fire upon any vehicle or infantry that make their way into the trench, as well as to make it extremely difficult for a tank to get out of the pit should it fall in.

100 meters out from the closest Dragon's Teeth barricade is a second and identical ring comprised of the pyramidal, durasteel blocks in five staggered rows. Rings of these dragon's teeth barricades are placed every 100 meters from the perimeter fence out to a distance of 665 meters. Leaving the final 135 meters between the outer-most barricade and the treeline open and barren. Anti-tank and anti-personnel minefields are scattered throughout each 100 meter wide area between the rings of Dragon's Teeth, but not within the Dragon's Teeth themselves, nor on the roadway. Likewise, the final 135 meters from the treeline to the outermost ring of Dragon's Teeth is not mined. Instead of a minefield, the space between each row of Dragon's Teeth was filled with spools of Concertina style Razor Wire made of alusteel.
Spaced 150 meters from the perimeter fence, spaced roughly every 70-75 meters in a circle around the facility are 42 hardened, decagon-shaped bunkers. Each bunker is made of Graphite-Reinforced Durasteel and connected to the main base's reactors which powers a system of ACS-402 Vehicle Shield Generators built into each bunker. Each bunker is 6 meters in diameter and protrudes 1.5 meters above the dirt. The bunker is semi-spherical with walls that extend 5 meters below the ground and encase thick the floor of the bunker in the same durable material as the walls and ceiling. Each side of the bunker is just under 2 meters wide. Nine of the bunker's 10 sides houses a 1 meter wide and 0.5 meter tall opening protected by ray shielding and equipped with Alusteel shutters that can be lowered over the opening. Each of these bunkers is supplied with five heavy weapons. These weapons are placed onto sliding mounting built into nine the walls of the bunkers, each mounting placed to allow a weapon to be slid out until its barrel protrudes through the ray shielding of a given section of wall, or to retreat and allow the Alusteel shutters to close. Ten to fifteen men are assigned to a bunker with five weapons from the following list: MT-40G, MCA-762CG "Ret'ini", HVKF-R-2, ACS-203 Hellfire Autocannon, and Hyperion Support Automatic Weapon. Each bunker is stocked with enough ammunition for several hours of sustained combat, including such special ammunition as the ACS-601 Dragon's Breath, and ACS-601 High Explosive rounds.
The 10th side of each bunker is a 1.5 meter wide opening that extends 0.5 meters above the ground and 1.5 meters below the ground. This opening lacks ray shielding, but is equipped with an Alusteel door that can be used to seal the bunker's only exit in the case of an emergency. This opening connects to a 3 meter deep and 1.5 meter wide trench that extends from the back of the bunker directly towards the closest guard tower and empties into the Anti-Tank Trench that surrounds the perimeter fence. From here, infantry are expected to walk along the trench to the closest Force Field Gate to safely return to the base. Though, in an emergency, a chain latter can be lowered from the closest guard tower to allow the individual to climb to safety, though this is typically disallowed outside of emergency situations. The trench that connects the bunker to the anti-tank trench is angled so that infantry on the perimeter guard towers can freely fire upon any hostile infantry that make their way into the trench network. Similarly, the power conduits that run between the main base the the individual bunkers can by physically severed from within the bunker itself, from the closest guard tower, or from within the main building.
Profile View


Image Source: Wookieepedia, MS Paint,
Citation: The general theme and several portions are based heavily on the wookieepedia entry for the IM-455 Modular Garrison. Additionally, a section of a wikipedia article on Dragon's Teeth is quoted within this sub. Any direct quotes are cited appropriately with a link to the appropriate source. General Population and Combat Forces section borrow heavily from IM-455 sub, with minor edits.
Development: Here
Intent: To create a believably sized planetary garrison base, based on canon sources, for use in an upcoming invasion and beyond.
Name: Mandalorian Heavy Outpost
Classification: Cer'keldab-class Heavy Outpost
Location: Wayland, (currently)
Affiliation: Mando'ade
Main Structure Height: 200 meters
Main Structure Width: 280 meters
Death Fence Diameter: 680 meters
Death Fence Circumference: 2137.1429 meters
Diameter from Treeline to Treeline: 2,280 meters
Circumference of Clearing: 7165.7143 meters
General Population:
- 300 Command Personnel
- 500 Support/Services Personnel
- 200 Technical Personnel
- 200 Science Personnel
- 100 Medical Personnel
- 320 Gunners/Weapons Technicians
- 80 Walker/Droid Technicians
- 70 Trade Mission/Diplomatic Personnel
- 60 Ground Crew Technicians
- 25 Beast Controllers
- 25 Sensor Technicians
- 10 Speeder Bike Technicians
- 50 Mandalorian Intelligence Officers
- 40-100 Walker Crewmembers and/or Cavalry Riders
- 48 Starfighter and Dropship Pilots
- Up to 600 Vehicle Crewmembers
- 800 Mandalorian Shock Infantry
- 200 Mandalorian Recon Infantry
- 150 Mandalorian Security Personnel
- 40 Mandalorian Special Forces
- 3 Starfighter or Gunship Squadrons
- 1 Shuttle or Dropship Squadron
- 3 Squadrons of 1 Bral Vehicles, 1 Mythosaur Mobile Fortress', or 4 Ori'akaan Shukure
- 2-5 Squadrons of 20x Bev'uliik Ramikade, Bes'uliik MkII Wardroids, Cerberus Wardroids, Trat'aab Walkers, Tracyaat Walkers, or Guardian Recon Druids,
- 5-10 Squadrons of 5 Reliant MTs, R-10-8 MTs, R-10-AA AATs, MT-31 Lancers, or 15 Oya'karir Ground Vehicles, Kyr'am Goore, Akaan'ade Kyr'amude,
- 5 Squadrons of 3-5 Myrkava MBT, Redeemer MBT, Canderous MAT-12, or Skocha MBT
- 100 Support Vehicles, such as Jair'iviin Speeder Bikes, Snake Eyes Tumbler, Shadlaar Cargo Truck, Warthog Construction Vehicle, Cricket Construction Vehicle, AT-MP Mining Vehicle,
- 1x HAS Military Shielding
- 3x Tempest Orbital Defense Cannons
- 6x Kebii'tra Aranar AA Platforms
- 12x Kerauno Missile Turret
- 6x Light Tractor Beam Projectors
- 6x Directional Repulsorlift Jammers
- 1x HAS Military Shielding
- 1x 10 meter high Death Fence surrounding perimeter with three Force Field Gates for exit and entry
- 21x Guard Towers; One on either side of each Force Field Gate and roughly one every 100 meters
- 21x Bi-pod mounted .52cal Anti-Infantry Guns, each located atop a Guard Tower
- *Durasteel Walkways running between Guard Towers
- 56x Tank Pits placed along either side of 1,000 meters of roadway, spaced every 35 meters
- *Anti-Tank and Anti-Infantry Minefield between roads, perimeter fence, and main structure
- *Anti-Tank Trench next to inner Perimeter Fence
- 5x Roads leading from base into jungle
- 42x Bunkers armed with heavy weapons
- 42x Trenches leading from Bunkers to closest Guard Tower
- *Anti-Tank and Anti-Infantry Minefield between roads
- 7x 15-meter thick rows of Dragon's Teeth placed every 100 meters
Description:
The main structure of the Cer'keldab-class Heavy Outpost is a modernized IM-455 Modular Garrison constructed out of Graphite-Reinforced Durasteel and powered by six Tenloss L-HARC Hypermatter Reactors. It is comprised of eight levels and is topped "by a sensor and communications tower. Levels one through five, all identical in size and shape, consisted mainly of large surface vehicle bays where all the surface vehicles were stored, maintained, and deployed from. They also contained most of the personnel quarters as well as the armory, detention cells, and most other key base areas."(x) "Level six held the officer's quarters, ...fighter pilots' quarters, command rooms, and so on. Level seven consisted entirely of ...starfighter hangars. Level eight was the deployment chutes and control rooms for the base's (starfighters). (Starfighters) were launched, retrieved, and manipulated by the base's powerful suite of tractor beam projectors. Garrison bases also (have) underground sub-levels which contain the (reactors) and main infastructure."(x) These underground sub-levels are extensive and extend outward from the main structure to 120 meters at the furthest point, and 80 meters at the deepest. The underground sub-levels are made of the same Graphite-Reinforced Durasteel as the rest of the complex, but are built after the base's initial installation as the needs of those working out of the base expand beyond its initial capabilities.
The main structure of the base is 200 meters tall and 280 meters wide. A 200 meter wide open space extends beyond the exterior of the structure and is surrounded by a perimeter energy fence. This area is known as 'the courtyard'. Beyond the perimeter fence is an 600 meter open space dotted with bunkers, trenches, anti-tank traps, a handful of roads wide enough to turn an AT-AT around on, and an expansive minefield. This area is called 'the garden' and is often pot-marked by craters, and the bunkers that dot it are often referred to as 'the office' by the troops assigned to man them. Beyond the outermost layer of defenses, a further 200 meters of open field is kept clear with a regular culling of local flora. This area is often referred to as 'the back 20'.
A 50 meter road connects the main entrance of the structure to a 1,000 meter long circular road that nearly encircles the entire main complex. At three points, one of which being the far end of the main road, three 50 meter long roads branch out towards the three Force Field Gates that allow entry and exit through the Death Fence. On either side of this road, spaced roughly every 35 meters, is a Tank Pit. Each Tank Pit is a simple hole dug in the ground and reinforced with wood logs. The hole is rectangular and shaped specifically to house a tank at a depth that allows the turret to be protrude above the ground but leave the rest of the vehicle concealed. The rear side of this hole is a dirt ramp reinforced by wood logs, allowing a tank to enter or exit the Tank Pit as the vehicle's commander pleases. Each ramp is angled towards the main structure and is angled in a manner that allows the base's defensive weapons a clear line of sight into each and every Tank Pit.
The three roads that exit the compound through the perimeter fence branch off into a total of five roads leaving the compound. Each road takes a twisting, turning, spiral route through the surrounding 800 meters of open space between the perimeter fence and the treeline. Since the roadways are the only safe way through the minefields, these roads twist and curve so as to greatly extend the amount of time an approaching hostile must spend in an open and exposed position as they close on the compound under heavy fire. Each of these roads is also lined with a Tank Pit on either side of the road at every 35 meters out to a distance of 250 meters from the perimeter fence. Each of these tank-pits exit towards the main structure and is angled in a manner that allows the base's defensive weapons a clear line of sight into each and every Tank Pit.
The HAS Military Shielding for the base taps into the bank of six Tenloss Hypermatter Reactors and has two sets of emission towers. The inner set of emission towers surrounds the primary structure itself, and produces a significantly stronger shield than the outer set of emission towers. The outer set of emission towers are placed just within the perimeter of the Death Fence, causing an active Ray shield to be projected on the outside of the Death Fence and the particle shield to be emitted on the interior side of the Death Fence. Only one set of emission towers is activated at a time. Built into the frame of the main structure are three Tempest Orbital Defense Cannons, which are able to fire at any target within a 30-degree cone while pointed strait up. Each turret is only capable of 45-degrees of declination at its base, along a set angle. From anywhere along this angle, as well as when pointing strait up, each weapon is capable of firing at any orbital target in a 30-degree cone. Meaning that the weapons are incapable of use against ground targets and have too-slow of tracking speeds to effectively engage starfighters. Capital ships that happen to find themselves within the arc of one of these weapons, and far enough from the ground, are generally displeased to find these massive turbolasers operational.
Also built into the walls of the fortification are a number of defensive turrets and secondary weapon systems. A single Kebii'tra Aranar AA Platforms protects each of the structure's six sides. These turrets are placed to give them a wide view of incoming aircraft, but also to allow each turret to fire upon ground targets, including those beyond the Death Fence. Also built into the walls of the structure are twelve evenly spaced Kerauno Missile Turret capable of firing a wide range of missiles that include their standard anti-air complement, laser-guided surface-to-air and surface-to-ground variants of their standard missiles, as well as FU-2 Rockets. Situated near these missile launchers and AA platforms are six directional repulsorlift jammer projectors capable of emitting a 600 meter beam of effect that is 45 meters at its widest point.
Along the interior of the Death Fence runs a durasteel walkway at a height of 8.5 meters from the ground. This walkway is held up by several Graphite-Reinforced Durasteel pillars and connects each guard tower to one another. Each guard tower is made of Graphite-Reinforced Durasteel and is equipped with spotlights, a bi-pod mounted anti-personnel heavy weapon, and a number of basic sensor and communications systems. Each decagon-shaped tower has 8 glasteel windows that can be slid open or closed and eight alusteel shutters that can be used to seal these windows. On two of the tower's sides that face the compound, these windows are replaced by standard sized alusteel doors. Typically, 2-5 Infantry man each of the perimeter fence's 21 towers and a small number of men patrol the walkways between each tower.
Along the outer edge of the Death Fence, just three meters from where an active ray shield would project, is a wood reinforced trench designed to stop tanks. The trench is 15 meters wide at the top and 4 meters wide at the bottom and 6 meters deep, with a staggered, five-deep row of Dragon's Teeth running along the outer edge of the trench. The Dragon's Teeth barricade "rested on a (duracrete) mat between ten and (20) meters wide, sunk in a meter or two into the ground (to prevent any attempt to tunnel underneath them and place explosive charges). On top of the mat were the teeth themselves, truncated pyramids of reinforced (duracrete) about a meter (and a half) in height in the front row, to two (and a half) meters high in the back. They were staggered and spaced in such a manner that a tank could not drive through."(x) The angle of the interior slope of this trench is designed so that gunners on the Guard Towers or along the perimeter walkway have a clear line of sight to fire upon any vehicle or infantry that make their way into the trench, as well as to make it extremely difficult for a tank to get out of the pit should it fall in.
100 meters out from the closest Dragon's Teeth barricade is a second and identical ring comprised of the pyramidal, durasteel blocks in five staggered rows. Rings of these dragon's teeth barricades are placed every 100 meters from the perimeter fence out to a distance of 665 meters. Leaving the final 135 meters between the outer-most barricade and the treeline open and barren. Anti-tank and anti-personnel minefields are scattered throughout each 100 meter wide area between the rings of Dragon's Teeth, but not within the Dragon's Teeth themselves, nor on the roadway. Likewise, the final 135 meters from the treeline to the outermost ring of Dragon's Teeth is not mined. Instead of a minefield, the space between each row of Dragon's Teeth was filled with spools of Concertina style Razor Wire made of alusteel.
Spaced 150 meters from the perimeter fence, spaced roughly every 70-75 meters in a circle around the facility are 42 hardened, decagon-shaped bunkers. Each bunker is made of Graphite-Reinforced Durasteel and connected to the main base's reactors which powers a system of ACS-402 Vehicle Shield Generators built into each bunker. Each bunker is 6 meters in diameter and protrudes 1.5 meters above the dirt. The bunker is semi-spherical with walls that extend 5 meters below the ground and encase thick the floor of the bunker in the same durable material as the walls and ceiling. Each side of the bunker is just under 2 meters wide. Nine of the bunker's 10 sides houses a 1 meter wide and 0.5 meter tall opening protected by ray shielding and equipped with Alusteel shutters that can be lowered over the opening. Each of these bunkers is supplied with five heavy weapons. These weapons are placed onto sliding mounting built into nine the walls of the bunkers, each mounting placed to allow a weapon to be slid out until its barrel protrudes through the ray shielding of a given section of wall, or to retreat and allow the Alusteel shutters to close. Ten to fifteen men are assigned to a bunker with five weapons from the following list: MT-40G, MCA-762CG "Ret'ini", HVKF-R-2, ACS-203 Hellfire Autocannon, and Hyperion Support Automatic Weapon. Each bunker is stocked with enough ammunition for several hours of sustained combat, including such special ammunition as the ACS-601 Dragon's Breath, and ACS-601 High Explosive rounds.
The 10th side of each bunker is a 1.5 meter wide opening that extends 0.5 meters above the ground and 1.5 meters below the ground. This opening lacks ray shielding, but is equipped with an Alusteel door that can be used to seal the bunker's only exit in the case of an emergency. This opening connects to a 3 meter deep and 1.5 meter wide trench that extends from the back of the bunker directly towards the closest guard tower and empties into the Anti-Tank Trench that surrounds the perimeter fence. From here, infantry are expected to walk along the trench to the closest Force Field Gate to safely return to the base. Though, in an emergency, a chain latter can be lowered from the closest guard tower to allow the individual to climb to safety, though this is typically disallowed outside of emergency situations. The trench that connects the bunker to the anti-tank trench is angled so that infantry on the perimeter guard towers can freely fire upon any hostile infantry that make their way into the trench network. Similarly, the power conduits that run between the main base the the individual bunkers can by physically severed from within the bunker itself, from the closest guard tower, or from within the main building.