Star Wars Roleplay: Chaos

Register a free account today to become a member! Once signed in, you'll be able to participate on this site by adding your own topics and posts, as well as connect with other members through your own private inbox!

The Journals of Etorre Agnusdei, M.D. - Volume II

It has occurred to me that an improvement on my respiratory equipment requires replacement, something I have been delaying for some time now. After some thought I have decided to chronicle the endeavor for future reference should I require replacing my equipment once more.

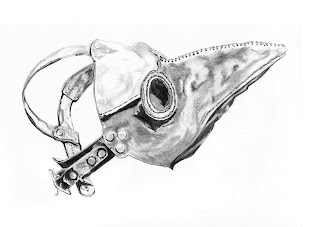
My duties and experiments often require protective breathing apparatuses and such is the nature of my work that I wear such things constantly. For this new mask it was necessary to have a completely hermetically sealed respirator and goggles. Early designs had the two separated which became more of a hassle the longer they were worn. A single unit was required and so I created the respirator and set the device into a sealed mask. The design is irrelevant, though I will admit that I took a liking to the attire and designs of masks and clothing on a planet that I visited in my youth. This preference created the beaked mask I wear today.

The mask itself is constructed of treated and fully sealed leather bound together and completely sealed to keep oxygen and the elements out. Underneath lies a rigid construction of duraplast supporting ribs to give the mask its unique shape and provide structural support for the devices I shall install into the mask later. The outer shell of the mask was encased in armor-grade duraplast, also fully sealed, with sections left open for access ports and other devices that I shall install soon. The leather alone would be sufficient for an airtight seal, but leather can be damaged or punctured. Therefore, the duraplast was necessary as the outer shell.

Along with this, glassteel lenses were installed. The lenses are mirror-tinted to keep excess light out and are also sealed to maintain the airtight seal of the mask. The mask itself is secured by leather straps to the head to keep it in place, sealed, and immobile.
 
Once the shell is done, it is time to test the device. Place sealed panels over the open ports to simulate the devices that will be placed within later on and test the mask's seals. Different designs hold different weak points. For the beaked mask, the weak points are around the eyes and at the tip of the beak. Reinforced seals and constant inspection and upkeep will minimize if not remove entirely the risk of seal loss.

Early designs
sketch.jpg
Finalized design
plague%2Bmask%2B2.jpg
In the end, the mask is resilient to damage and completely sealed to the environment. Duraplast's resiliency can withstand the more caustic environments and the mask itself will withstand significant abuse. I theorize it may even withstand enemy blasters, though lightsabers and sustained assaults will damage or destroy the mask.
 
At this point, should the mask prove itself in the seal tests, the additional components may be added. Primarily, the shielding device based at the tip of the beak.

The device is simply a scaled down, micro personal shield. It weighs no more than two or three grams and is small enough to fit within the beak snugly. The power pack is easily changed by removing the mask and exchanging the power cells of the generator. The shielding device has enough power for upwards of fifteen minutes of standard use, though under heavy use or constant assault, it will only maintain energy for a handful of minutes. Perhaps five at the most, if one is lucky.

The device is anchored to the leather itself and linked to a control stud set externally into the duraplast casing near the base of the beak. A simple depression of the stud activates the shield. Another press of the button deactivates the device. A small light located into the rim of the right goggle lens inside the mask alerts the wearer to the energy shield's power levels. Green for full, yellow for medium charge, red for low charge, flashing red for imminent power loss.

A depiction of the shield generator used.
xarmor_component_deflector_shield_emitter_assembly1343276589.5.jpg.pagespeed.ic.eHWQ872BYL.jpg
 
Once the shield is installed it becomes paramount that the gas canisters are installed behind the generator. One can install purpose built canisters into the mask, though I have found re-purposed micro gas canisters far more easily obtained. The canisters are also easily replaced when needed and many can hold the more caustic materials I store within them.

These must be locked into place and set into the gaskets in the mask's leather and duraplast ports. They are arranged in a diagonal formation, three on each side, and are set in a way that they cross each other every at every other gasket. Once placed, the duraplast ports are placed over top and sealed shut. When needed, the canisters can be replaced by removing the physical canister from the mask internals by removing the mask and exchanging canisters, much like the shield generator. Each canister has enough aerosol fluid within to fully fill an eight by eight by four meter room easily. Once in place and the ports sealed, the devices are wired to a series of studs located alongside the beak of the mask, close to the lenses. At the press of the activation stud, the corresponding canister immediately releases the aerosol inside into the atmosphere around the user. Each aerosol canister can be tailored according to preference, though care must be taken before venturing out as to exchange canisters, one must remove the mask. Such an action could prove dangerous depending on the situation.

As a final note, it is highly important to create an airtight seal behind the canisters by mounting a duraplast barrier mounted to the structural ribbing. This prevents any leaks or ruptured canisters from harming the wearer.

Simple, repurposed, industrial micro gas canisters
407491987_336.JPG
 
At this point it becomes necessary to plan ahead. Predicting future additions to one's equipment is very important as it eases any further work one may require.

For this reason, I have installed and left empty a series of small compartments in the mask itself. The reason for this is quite simple. I have left a compartment open for any other gadgets or inventions I shall design at a later date. I have a sketch drawn months ago of a potential scanning device that I could install into the mask. The theory is that midichlorians emit the Force in an aura around them, something confirmed in my studies of both Jedi and Sith, which should mean that such an aura is detectable by sensitive scanners. One could even measure their level of Force sensitivity, though this is only a theory.

Another compartment I have left empty should I ever require or obtain a stealth system that I wish to install. At the moment, I have no need of one, though I may require such a device in the future depending on the task required. A machination designed to hide oneself from the eyes of those watching would be valuable indeed. I shall make a note to obtain such a thing in the future.
 
A further compartment was left empty for yet another design I have theorized. A device that harnesses weaponized energy used against the wearer and transfers it to the mask's systems to power them.

Of course, this would be a dangerous endeavor. My initial schematics show the device is prone to failure, malfunction, and overloading, but again, it is but a theory. However, including such a device in the mask is a possibility that could prove extremely valuable, especially in areas where dangerous levels electrical energy is part of the environment or in the event one is attacked with ion weaponry.

At this point, one can reinforce the electrical wiring and ensure the mask's hermetic seals are still functional. While the risk of those seals becoming damaged during the internal construction process is low, it cannot be ignored. Testing the seals is but a very important step in the process.
 
Once the seals are tested, the mask is ready for the final touches. At the bottom of the mask where the beak meets the wearer's chin, install a commlink. Outside the mask on the underside there will be a port left empty. Install a simply amplifier into that port and wire it to the commlink itself. Once done, wire an earpiece to whichever ear of preference for the wearer. In this case, this is the right ear. This layout allows the wearer to benefit from an installed commlink, allowing long distance communication, as well as the ability to more easily communicate with others nearby without the mask muffling their voice.

Once done, audio sensors are to be installed on the external surface of the mask while corresponding equipment is installed within. This allows the wearer to hear all around himself without the mask muffling the noise. This also allows the wearer to protect their hearing in the event of cacophonous noise levels. The standard safety system built into the audio sensors and amplifiers prevents this hearing damage automatically.
 
One of the smaller compartments I have set aside for yet another future experimental device. Along the top of the beak I have left another empty port. For now, it is sealed as with the rest of the mask. However, I have plans to install a short term use sonic blast generator into that compartment. This would allow me to stun my enemies should I find myself outnumbered and in close quarters. The device would allow me to stun those around me and escape, though it would theoretically be limited to one or two uses as sonic weaponry is rather power consuming.

Furthermore, the lateral strap that traces around the rear portions of the head feature a small, nondescript box attached to the leather. I managed to acquire a small, discrete sensor scrambler from a black market source. The device allows the equipment and electronics in my mask go undetected and unnoticed to any sensor device nearby. This allows me to keep my mask equipment hidden and unknown, giving me an edge in the event my enemies attempt to entrap me. Unfortunately, the device is rather old and functions poorly. I have replaced various internal electronics and attempted to return full function to the scrambler, but to no avail. The best that could be done was to make the system functional and reliable, so long as there is power to the device. However, because it is not at full functionality, the device only covers about two feet in diameter. Essentially, it hides the mask itself from sensor readings. I had hoped to apply this boon to all that I might carry, but I shall be content with this for now.

The sensor scrambler I obtained. It is old, but somewhat functional. It will suffice for now.
V834200135.jpg
 
From here one may apply simple items to the mask, though it is suggested to use micro versions of the materials. For example, a small pouch on the inside of the left cheek holds a Geiger counter. It is approximately an inch long and less than an inch wide. The device is attached to a very small device that projects a tiny display in the left lens. This display tells the wearer the general levels of radiation in the area. The device's sensitivity can be adjusted via verbal commands.

Along the forehead of the mask lie a few more components, each very small and easily installed and replaced. One is a device used for measuring ambient temperature. This is set into the duraplast casing and is unnoticeable. Another small display projector is mounted under the left lens as well to display the temperatures detected. I find this tool easily overlooked, but useful nonetheless. Along with this device is a small time piece. This device has been wired into the same display as the thermometer and appears in the left lens as well.

The micro geiger counter outside of the small cheek pouch.
thumb_3020_C7010B-sm.jpg
The thermometer and time piece, respectively.
ultrathindia.jpg
theresultsap.jpg
 
The last component I installed was a barometer. I will be frank, I didn't initially think to place the tool into the mask at first, but upon thinking through the component installation it seemed that having the tool would be useful upon occasion. I installed the small device into the mask's left cheek and wired the display into the right lens of the mask.

At this point, the only things left are to paint the mask and to test the seals once more. After a coat of bleached white paint, I tested the mask's seals and found them all airtight and fully intact. From there it was a simple case of testing the mask's capabilities. If everything has been installed correctly, there should be no other problems whatsoever.

The barometer device installed into the left cheek of the mask.
Multiwii-and-Megapirate-AIO-Flight-Controller.jpg
 

Users who are viewing this thread

Top Bottom